7 Common Oil, Grease and Fluid Leaks on the Vanagon
If your once beautiful driveway looks like a scene from the Exxon Valdez Oil Spill maybe it’s time to pinpoint the source of those leaks. Vanagons (like British cars) are notorious leakers.
I’ll attempt to point out the 7 common areas that you should check if you’re experiencing similar issues. It’s not only oil, but coolant and transmission fluid too. Obviously, I might miss an area or two, so just comment below and I’ll address it.
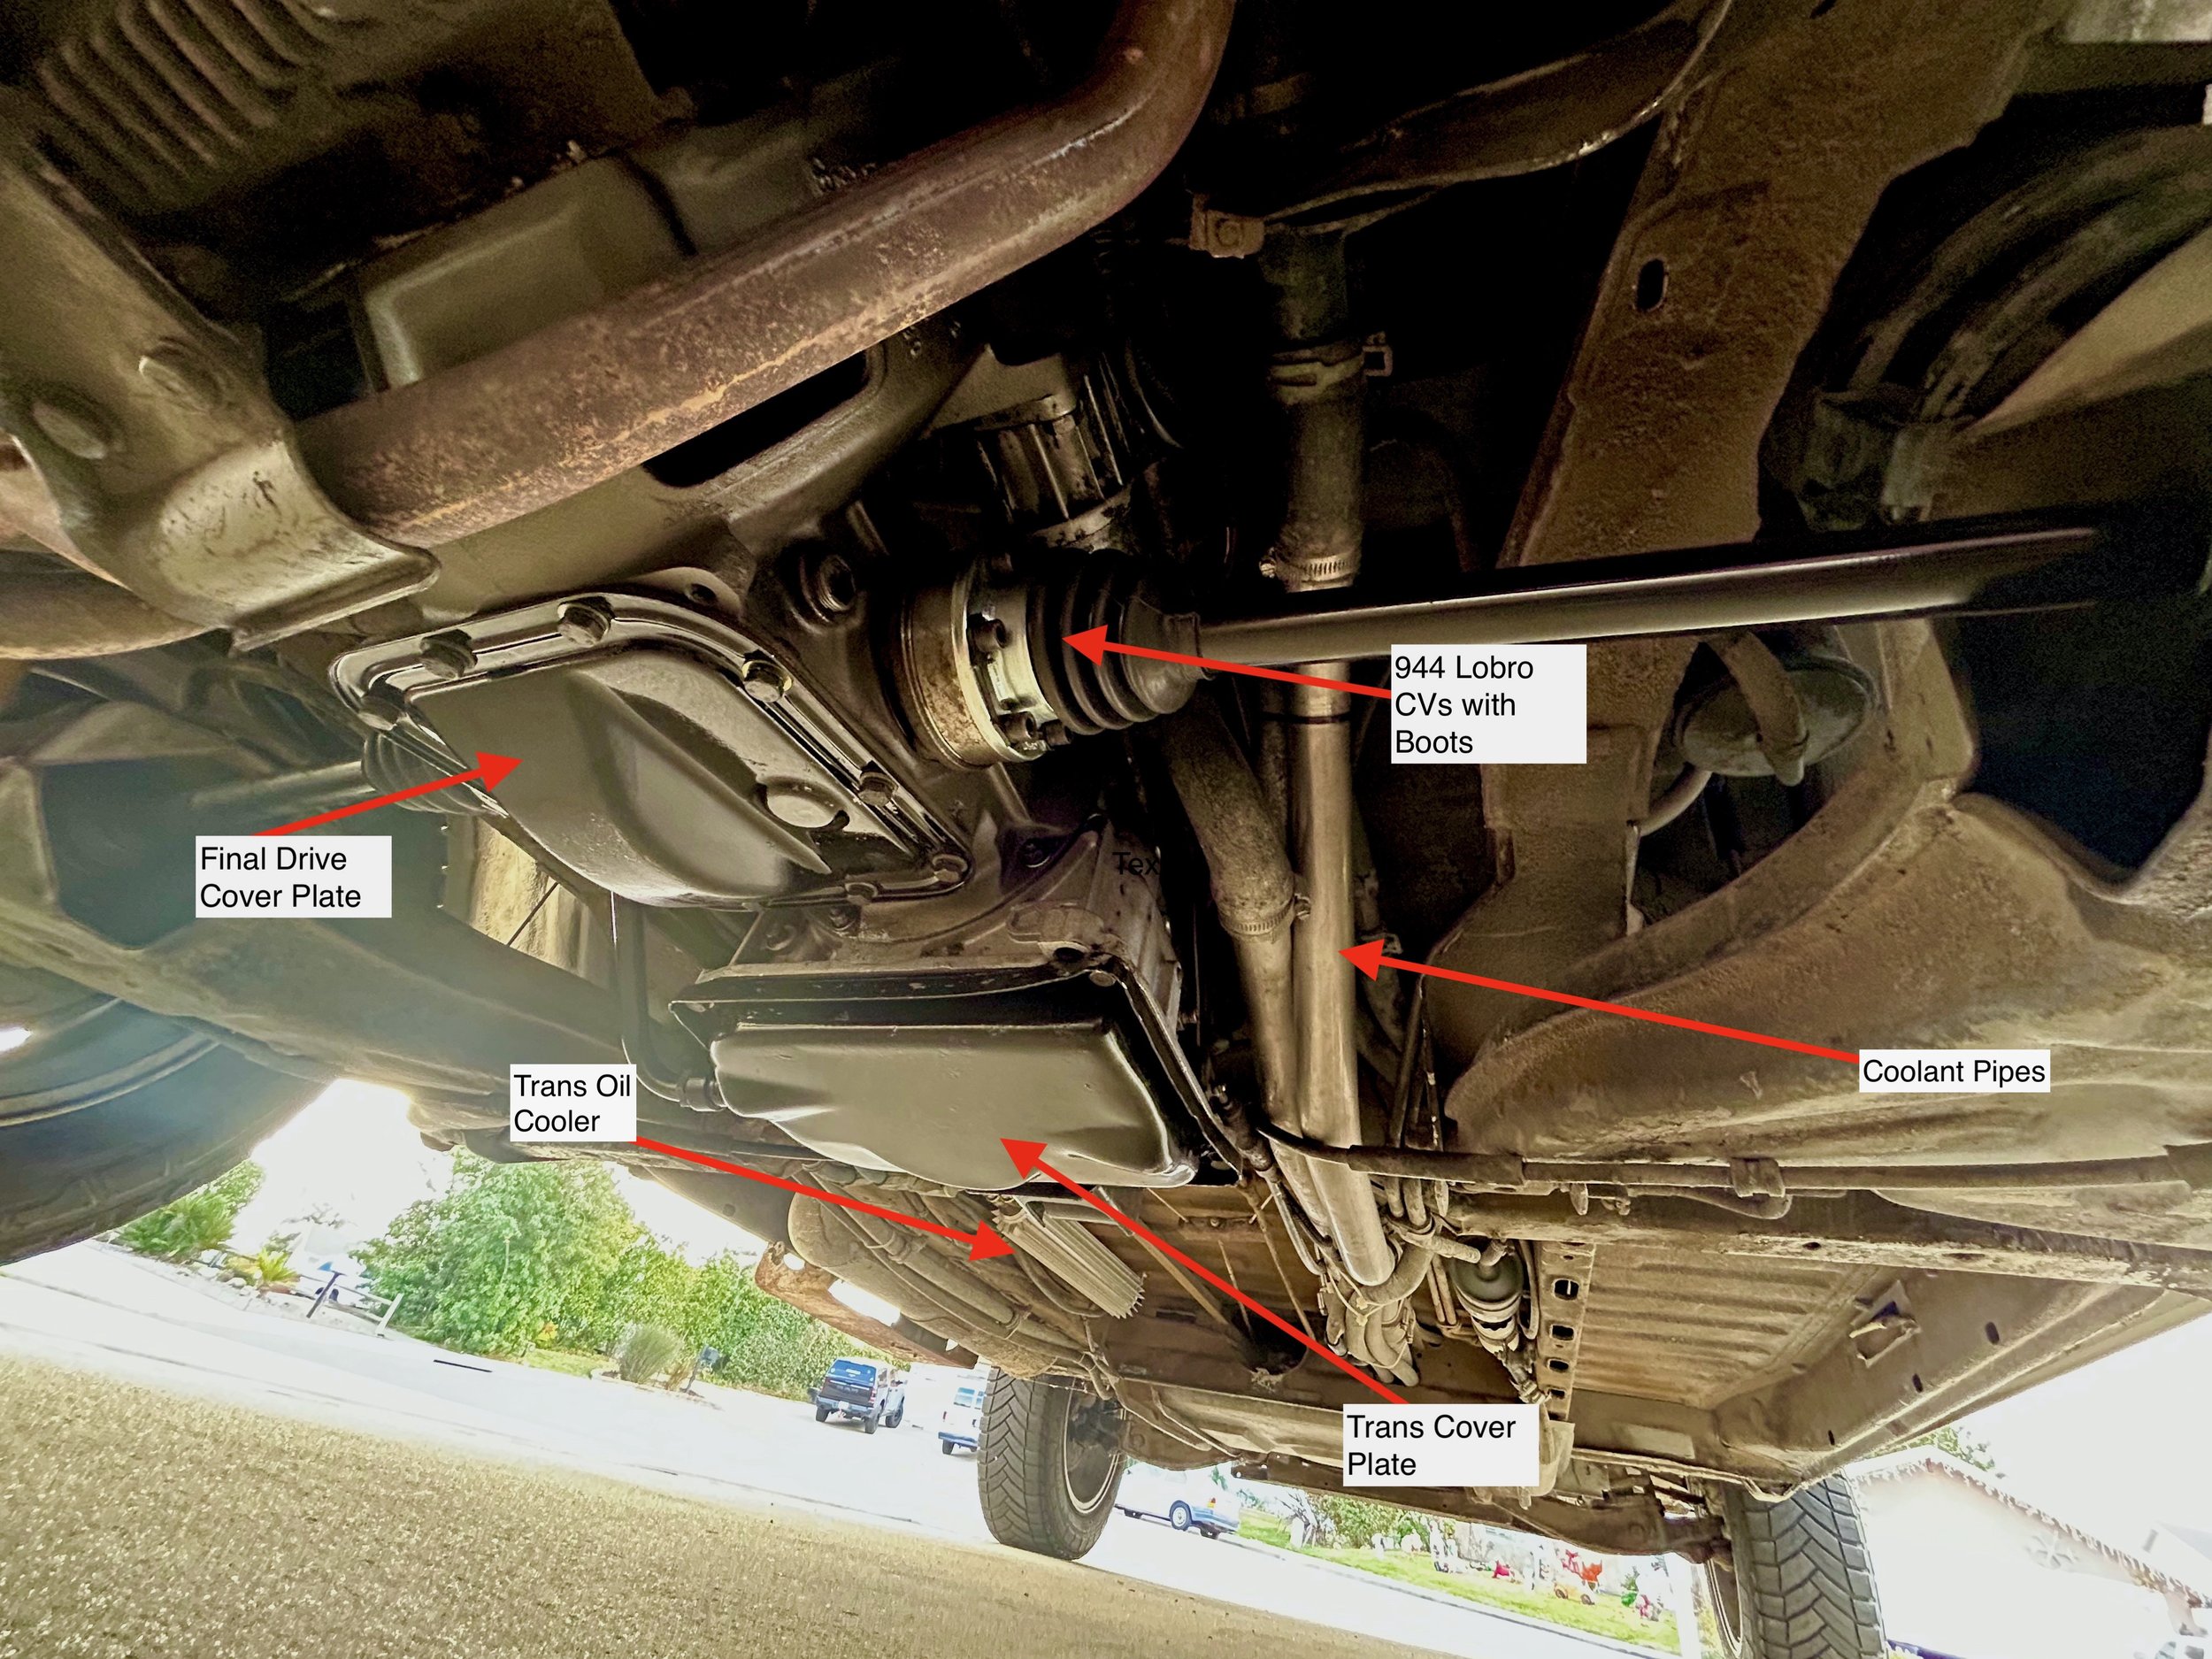
Common leaks are easy to spot on the Vanagon T3. Here are some areas to look first. This image of an automotive 3-speed Vanagon, depicts a newly refreshed transmission and axles. Carefully inspect the transmission and lines leading into it for oil leakage. CV boots often split open and grease oozes out. The transmission and final drive plates can loosen and might need torquing to prevent leaks, and lastly check out the valve covers while you’re under the vehicle.
Not every leak on the Vanagon is a big deal. Some people would rather top off the oil or fluid rather than repair the leak. But other leaks can be disastrous if left unattended (like the transmission). If you are frustrated by seeing oily, greasy spots everywhere you park your Vanagon, it’s time to hunt down the source of the problem.
I addressed every leak on my 1986 T3 Westy Automatic by crawling under and over the engine with a fine-tooth comb. I once tried to stop a continuous leak on my 3-speed auto transmission (outer case)by using Permatex Ultra Gray sealant. It worked for about 6 months. Then it started to drip again.
I decided to put a stop to all the leaks in a more permanent way. I took my Vanagon into the shop at Maxed Performance in Huntington Beach, California. I didn’t want to tackle the transmission leak myself. Never use any “stop leak” product in the engine or radiator, it can make your small problem a big problem.
Not all leaks need a specialist, a car lift, or special tools. Before you take the Vanagon into a shop look for answers on The Samba website. This Vanagon forum will be useful for such things as axle boot leaks, breather tower leaks, and coolant leaks. Those leaks can be handled with the correct tools and minimal knowledge.
Here are the 7 most common leaks I discovered on the T3 Vanagon:
#1 Valve Cover Gaskets
Located on each side of the wbx engine the valve covers have gaskets that over time leak with age. The Vanagon WBX is a sealed crankcase system. The pressure inside is vented by components like the crankcase breather tower. If the breather tower fails and can’t properly release the pressure it can escape through the valve cover gaskets. Be sure to check for leaks there.
Valve cover gaskets are made from cork or synthetic materials and are relatively easy to install. They are a common source of leakage and should be replaced immediately if they fail. With a visual inspection, you can spot a leak. It’s an inexpensive fix and doesn’t require much knowledge, or equipment. But there are methods for replacing the gaskets and certain procedures should be followed. If there is any damage to the valve cover itself be sure to replace it too. There are some smart DIYers online with advice on how to properly install valve cover gaskets because there is a right and wrong way of doing it.
#2 Drive Axles
The two Vanagon rear axles each have rubber boots that tear and rip over time. Once that happens they ooze CV grease, which is flung everywhere around the engine. Leaking axles also make horrible noises when driving because they are getting dried out. These CV joints and axles must be replaced immediately because the bearings can seize up and you won’t be going anywhere once that happens.
The automatic and manual Vanagon have different types of axles. Be sure to get the correct replacement product. There are cheap low-quality fully assembled axles and expensive high-quality axle/CV kits that must be pressed on. I used the cheap EMPI axles and they lasted for 15,000 miles before giving up the ghost. I replaced them with Porsche 944 Lobro CV joints and German axle shafts with new boots. (Note: EMPI axles worked for me for many miles, but Porsche CVs are the way to go in my opinion mainly due to their overall construction.)
Use a lift to examine your axle boots, and a flashlight to spot the slightest tear in the rubber. People do try to use sealants, but that’s a short-term fix.
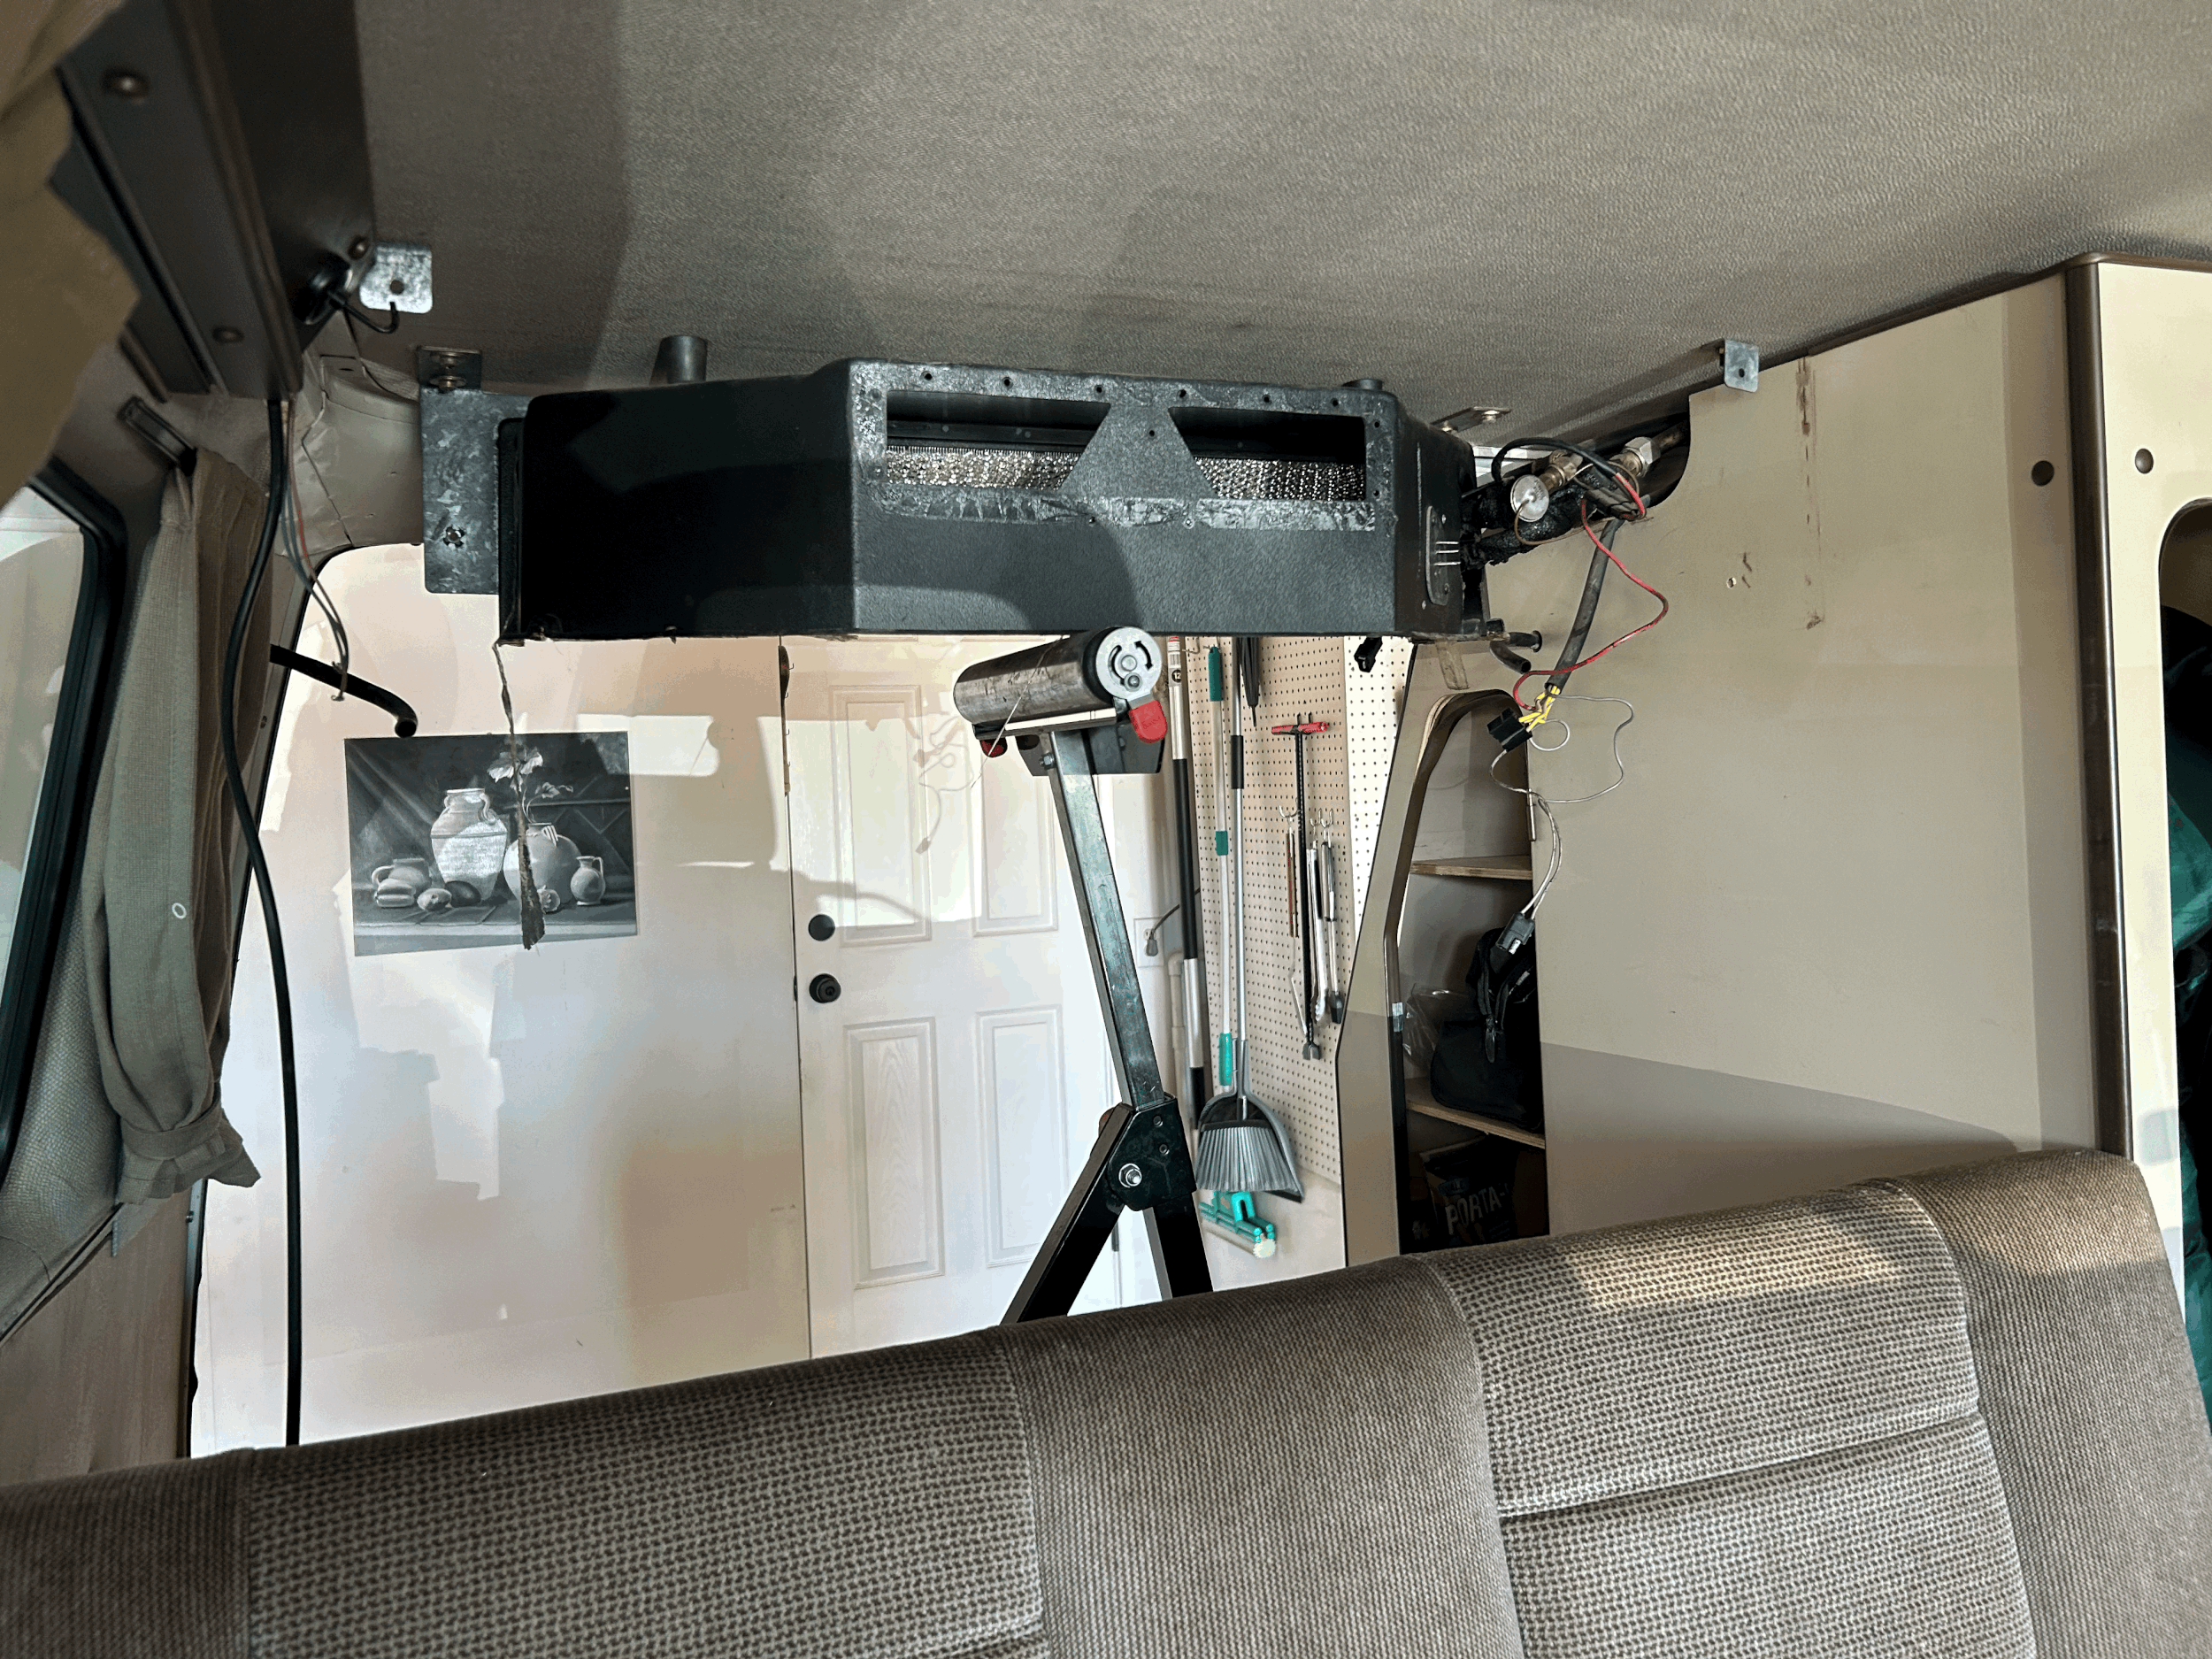
#3 Engine Breather Towers
Oil leaks can often be spotted at the breather tower. When all of the diaphragms inside the tower are working correctly they should regulate the pressure of the gases in the crankcase. There’s an o-ring at the bottom of the breather tower that periodically needs replacing, if it tears it will cause oil to leak. But sometimes the entire breather tower needs to be replaced. These breather towers for the T3 are cheap and easy to install at home. If you spot oil anywhere near the breather tower it’s time to replace or repair it. There are also hoses at the breather tower that should be examined.
A faulty breather tower can cause bad idles and other issues. If you want to learn more about breather tower issues check out this page from TheSamba.com.
#4 Power Steering Hoses
If your Vanagon has power steering go out back and check the hoses. There is a low-pressure and high-pressure hose that delivers the reddish power steering fluid, and these crack and leak over time. You’ll be able to tell immediately if they leak because the buildup of slime like fluid will be present around the sheet metal of your engine bay. It’s a DIYer thing, but it does take some research because you can easily cause more problems for yourself if you fail to install the pressure switch correctly. The switch is connected to the 12-volt system and if it shorts out it can take out your entire engine harness too! Be careful that the switch is never exposed to a short.
#5 Stock Oil Filter Cooler
I have had to replace the stock WBX oil filter cooler because of leaks. By crawling under your engine where the oil filter dangles down you’ll see that the filter is screwed into the stock oil cooler. It’s made of aluminum and if it leaks it is very noticeable. There’s an o-ring behind the cooler, which has to be replaced. These o-rings for whatever reason don’t seem to last long. If your Vanagon has the stock oil cooler this is a cheap, easy fix.
#6 Plastic Coolant Tank
The expansion coolant tank is under a lot of pressure when the engine heats up over time the plastic stock tanks begin to wear and crack. That’s because most plastic tanks for Vanagons are aftermarket. The original plastic tanks from Volkswagen are no longer available. When the aftermarket expansion tanks begin to turn yellow, leaks develop and your engine experiences overheating issues. Even a pin-sized hole can cause you grief.
The aftermarket blue caps on the T3 with the hose fitting that goes to overflow tank also have leaking problems. I have changed my plastic tank cap twice in seven years. This time I decided to go with the new GoWesty aluminum expansion tank, and better cap. The tank comes with a lifetime warranty and so leakage will never be a problem.
#7 Transmission Leak
The leak in my 3-speed auto transmission started as an infrequent droplet. I ignored it. But as time passed and the transmission neared 200,000 road miles, the drop became a constant drip, until eventually, trans fluid was pouring out of my transmission faster than I could put it in!
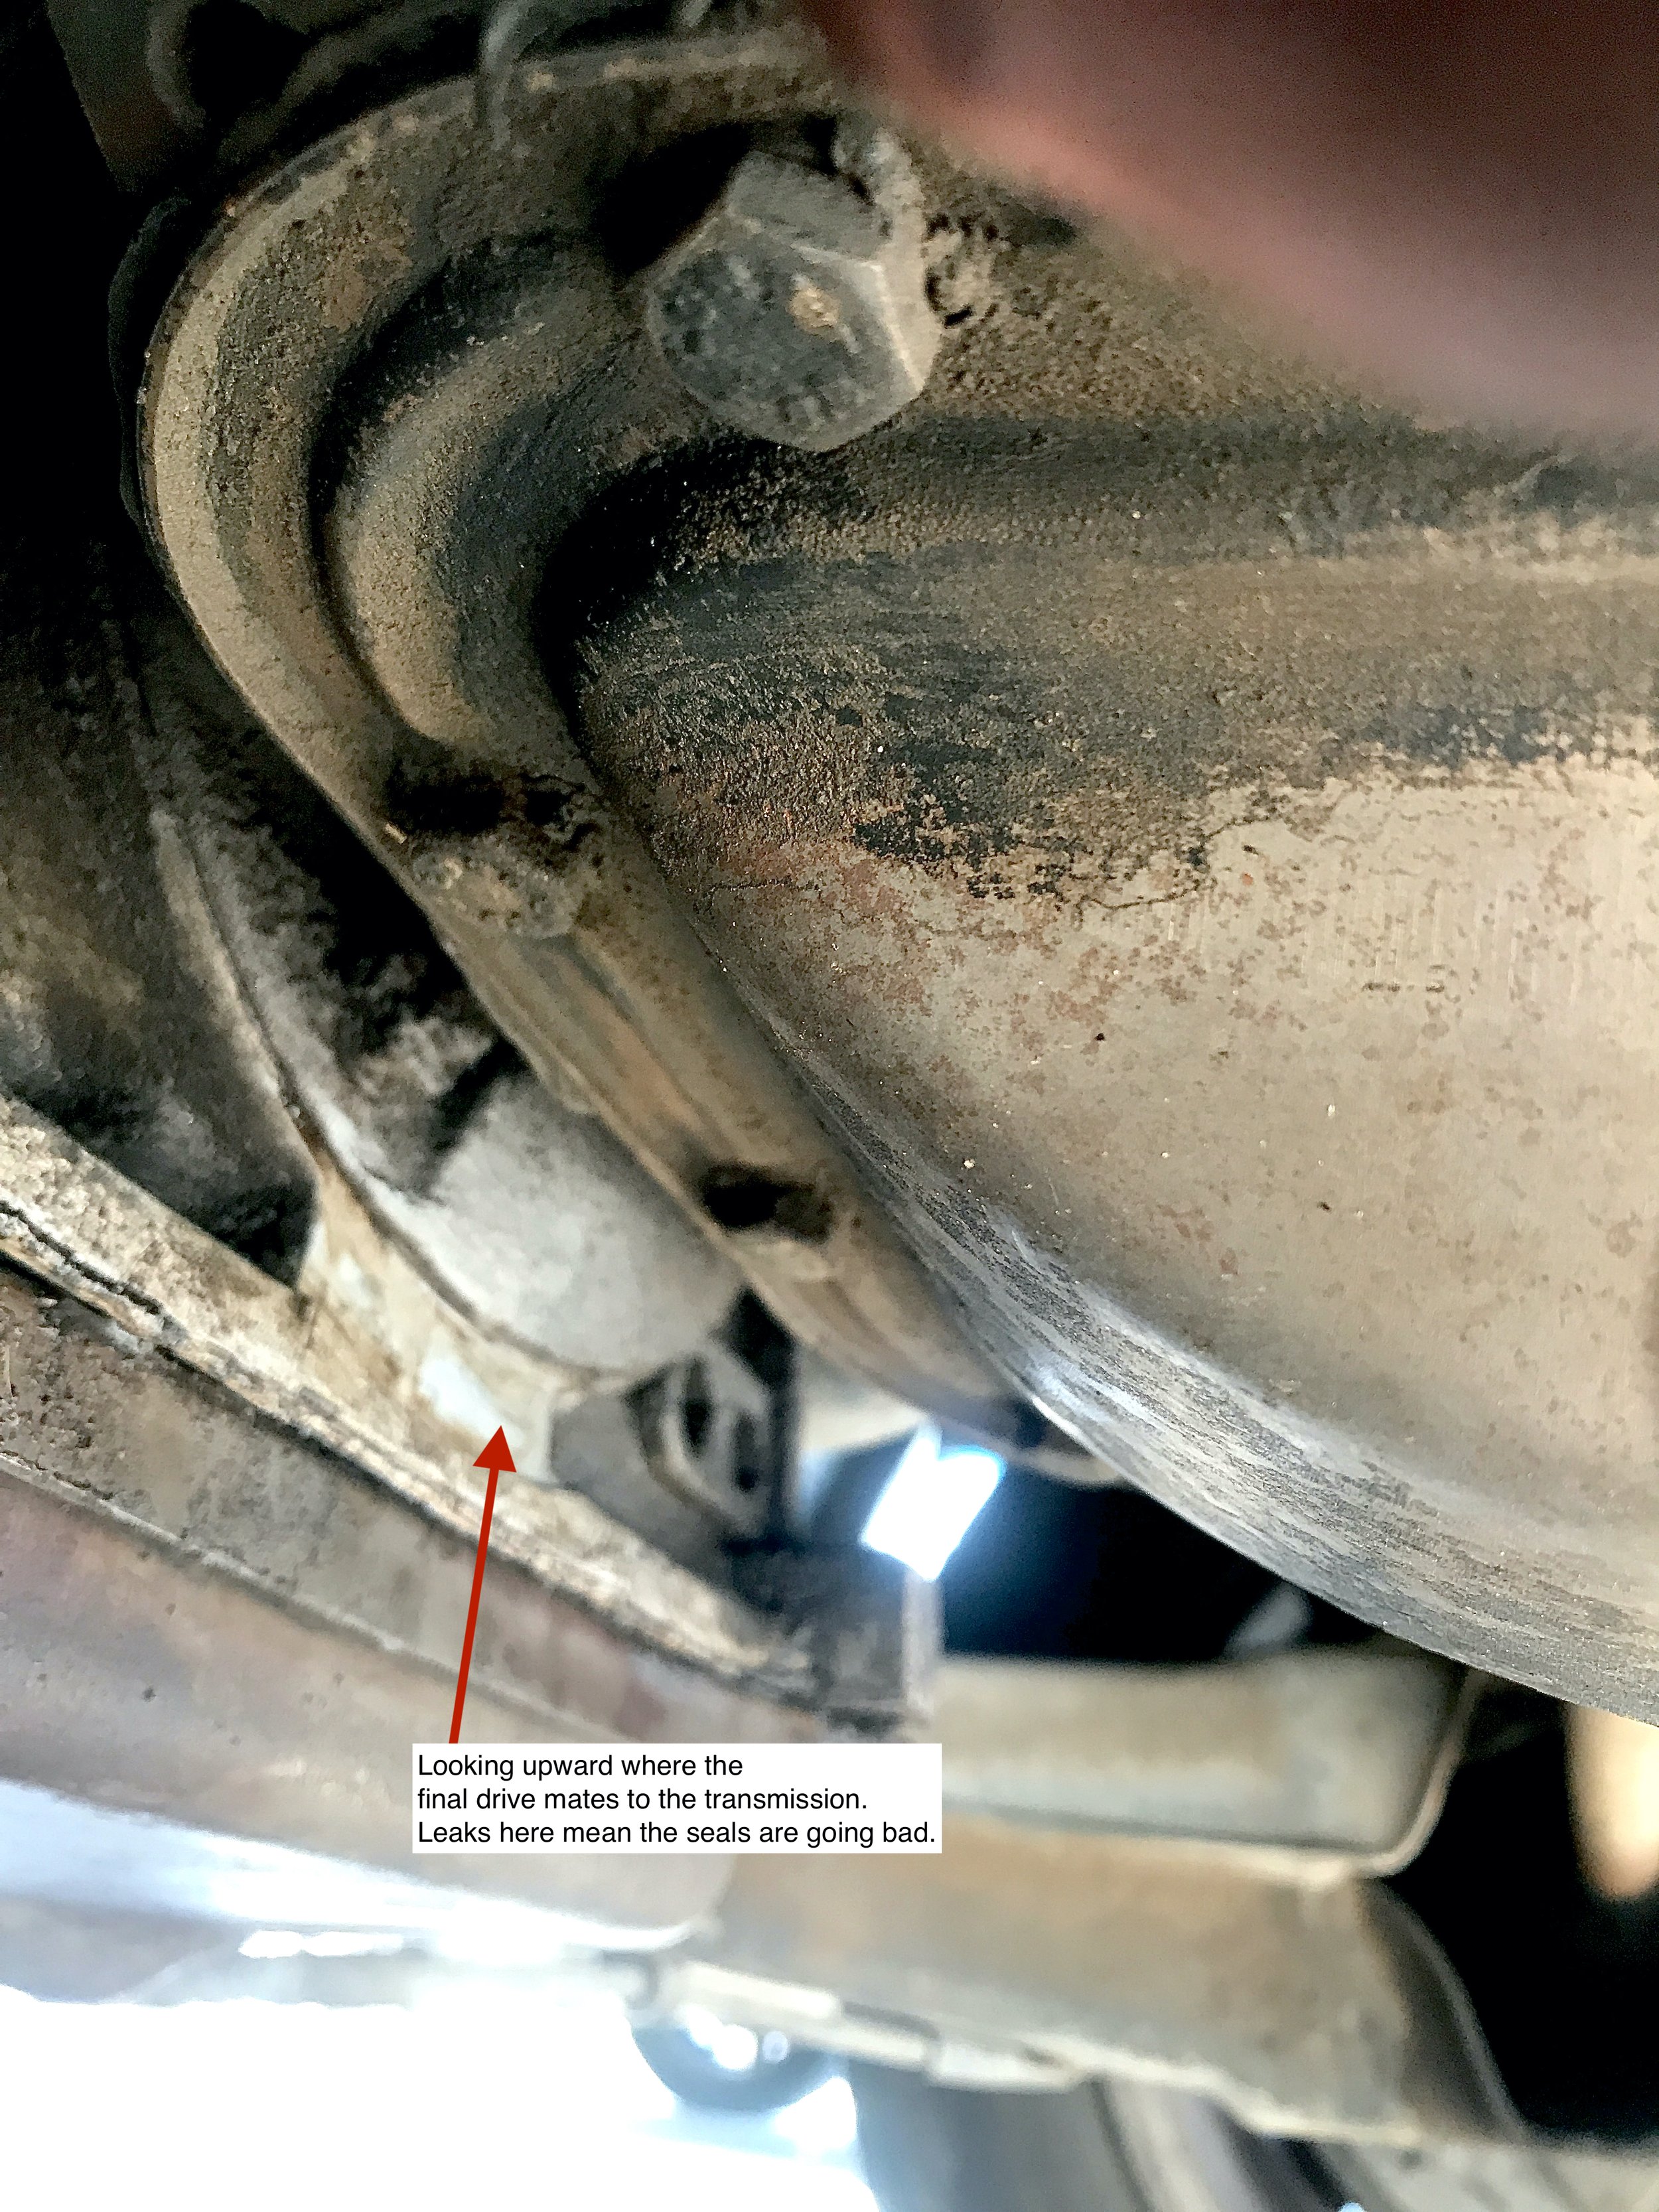
I pinpointed the leak to the area where the two halves of the transmission bolt together. I could see it leak when the engine was hot. That meant that the seals inside the final drive had failed. That could be serious if the transmission fluid were to mix with the gear oil on the other side of the transmission. I had no lift or experience with transmissions. I had to take it to the shop.
I talked to five different shops and dozens of other Vanagon owners before I made my decision. I choose Maxed Performance in Huntington Beach, California because the owner Ed and his wife Sonja are both Vanagon enthusiasts and they own no less than five of them. I was in good hands.
The transmission was completely rebuilt from end to end, and the cover plates are new with fresh gaskets. It’s absolutely beautiful and runs better than it ever had. It also has a two-year warranty.
If you find transmission fluid on your driveway check the transmission plates first and torque the bolts around it. Also, look at where the final drive mates to the transmission. Torque those bolts as well. If it is seals it will be obvious. A minor drop isn’t going to need a rebuild, but if the leak gets serious then it would be time to pull the trigger.
I researched this subject so I know just enough to get me in trouble LOL. However, if you have a leak anywhere near your transmission ensure that the “cover” plates at the transmission are tightened to the proper torque. Refer to the Bentley manual. A leak at any of the cover plates could also be caused by a warped plate or failed gasket. It’s an easy check, but do it when the engine is cooled.
For those wondering about costs. The range for a Vanagon automatic seal kit fix starts at $1,800 to replace the seals in the final drive. Every shop I asked quoted me the same price. But if you have a worn torque converter, planet gears and bearings then that will jump up to $4,000 or more. If you’re in Southern California call Ed first.